
So you have just started your blog, now what? This is where many bloggers find themselves after they have gotten their hosting and installed WordPress. In this post we go over a pre-launch blog checklist, that will take you from after the WordPress install to launching your blog.
You can get the printable PDF pre-launch blog checklist by signing up for our newsletter below. Along with the checklist you get other free goodies to help out with your blog.
Start Your Pre-Launch Blog Checklist
Now we need to go over the first things you should do after you have installed WordPress.
If you aren’t using WordPress, that’s ok too, just skip over the WordPress specifics, or apply the step as you can in the platform you are using.
I’ve tried to include as many screenshots as I can for this to make it easy to go through each step of the pre-launch blog checklist step by step.
Change Your Admin Display Name
First we want to make sure your login username/email isn’t visible to everyone.
Log into your WordPress admin, this will be www.yourDomainNameHere.com/wp-admin.
Once you are logged in in the upper right hand corner you’ll see “Howdy, yourusernamehere”. Hover your mouse over that and you will see a drop down menu appear. Select Edit My Profile.
Scroll down until you see Nickname (required) and Display name publicly as.
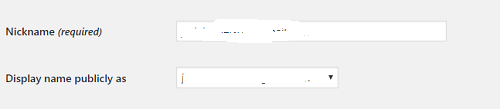
Here put in the name you want displayed on your blog posts in the Nickname field.
On the dropdown beside “Display name publicly as“, select the nickname you just put in.
Scroll down and select Update Profile.
Update Your Profile Picture
In the same profile page you updated your display name on, you can also update your profile picture.
Just a bit above the Update Profile button at the bottom of the page is the Profile Picture.
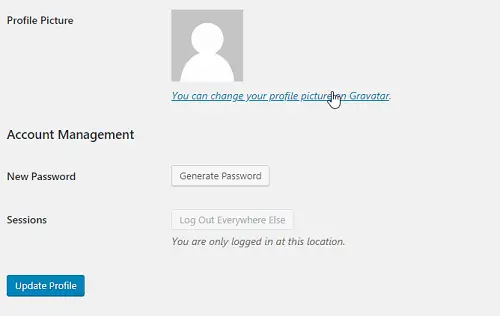
Just click on the “You can change your profile picture on Gravatar” link to update your photo with Gravatar.
Change Permalink Settings to Have Post Names
Next you want to make sure that your links on your blog are set to have the post name in the link.
The reason for this is to help with SEO for your blog posts. Having your title in the URL is one of the many steps for SEO.
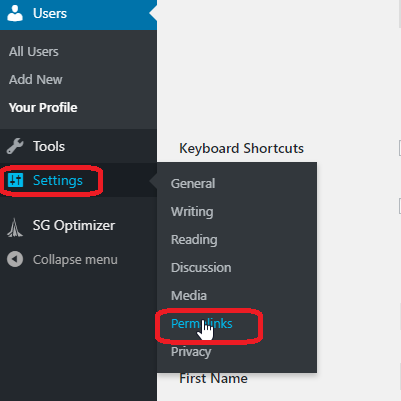
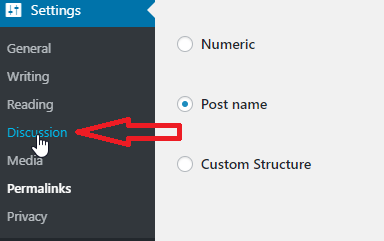
To do this go to Settings on the left hand side menu, then select Permalinks .

In the Permalink Settings make sure that the radio button beside Post Name is selected. Once you have that selected, press the Save Changes button at the bottom of the screen.
Set Your Discussion Settings
While we’re in the Settings section, lets also set your discussion settings for your blog.
You will want to determine if you want to allow pingbacks (usually I turn this off to help prevent spam) and if you want to allow comments.
Now I know “What is a blog without discussion?” But sometimes if you are just making a blog for passive income you might not want to have to worry about checking for comments and having spam.
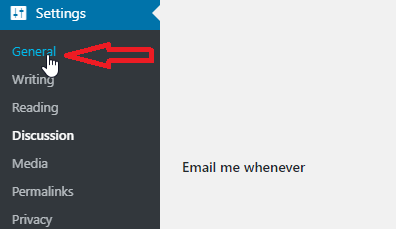
On the left hand side menu under Settings click on Discussion.
Here is where you can turn off comments, disable pingbacks, or set you attempts to notify other blogs you have linked to them.
You can also set details as to what needs to be filled out to leave comments, how many comments on a page, how the comments are ordered and other settings that you would like for discussions on your blog.
It is usually best if allowing comments to keep “A comment is held for moderation” checked to keep down on spam. (Don’t worry too much though we’re going to get a plugin for that too 🙂 )
Make Sure Search Engines Aren’t Discouraged
There is a setting in WordPress that discourages search engines. We need to make sure that it is not selected.
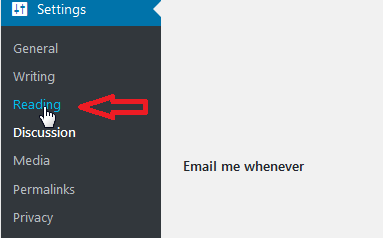
Under Settings click on Reading.
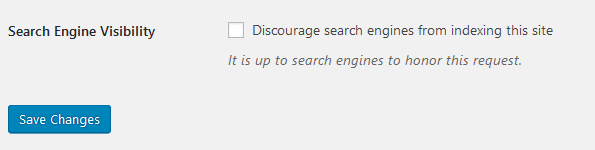
Make sure the “Discourage search engines form indexing this site” is not checked.
If it is, uncheck it and hit Save Changes.
Set Your Site Title and Tagline
Your site title will be just that, the name of your blog.
Your tagline can be a few words that explain what your blog is about.
These two things will help communicate what your website is about to first time visitors.
Under settings click on General.
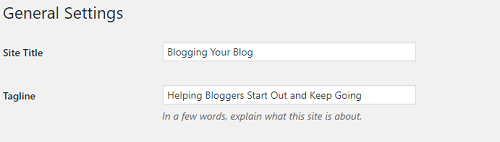
At the top of the page, set your title and tagline.
Rename Default Post Category in WordPress
The default category for all of your posts in WordPress is set to “Uncategorized” upon initial installation of WordPress.
It’s best to rename that category.
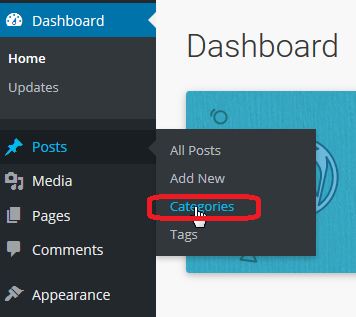
On the left hand side menu go to Posts and then click on Categories.
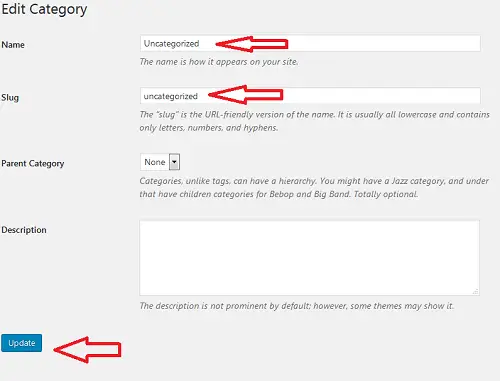
Then just click on Edit under Uncategorized and change the name and slug then press the Update button.
One of the best things to rename this is just the most general topic of your blog. For example on BloggingYourBlog I’ve renamed Uncategorized to Blogging. Or if you have a blog that is about Cats, then just name it Cats.
Change Your Blog’s Favicon
The Favicon is the little icon that appears in the tab of a browser window that your site is open on. The default favicon on a new install of WordPress is the grey globe.
You can find some free favicons you can use at Icons8.com, just go through them and find one that fits then download it.
Once you have one picked out go back to your WordPress admin.
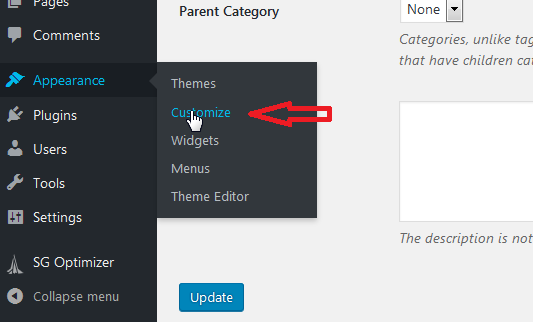
On the left hand side menu go to Appearance then click on Customize.
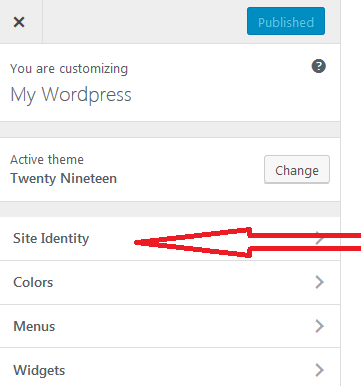
On the Customize page click on Site Identity
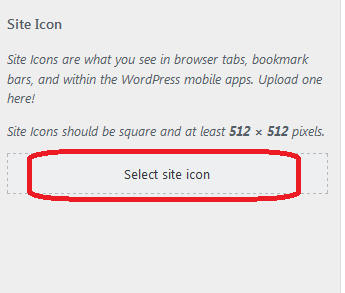
Then click Select site icon.
This will bring up your Upload Files window. Just select the favicon you downloaded and upload it to your site. You will then be able to crop the image if you would like or you can skip cropping. Once you are back to the customize screen just hit the Publish button, then click on the x button in the top left hand corner.
Set Up Your Google Analytics
One of the best ways to keep track of the number of visitors to your blog and their behavior is to use Google Analytics.
If you don’t already have a Google Account go ahead and sign up for one over at Google.
Then go to Analytics.Google.com and click on the Sign Up button and follow the sign up process, you will add your website info during this step.
If you already have a Google Analytics account, then you just need to add your new website to your account.
To do this click on the Admin on the left hand side menu of Google Analytics. Then in the middle column that’s labeled Property click on Create Property and follow the steps to add your new website info.
Once you install the MonsterInsights plugin, there will be a super easy wizard that will set you all up with integrating Google Analytics with your new blog.
PreLaunch Essential Plugin Installation
This is a list of the main plugins I install on any new blog that’s just getting started.
- Yoast SEO
- Cookie Notice
- WP Forms
- Antispam Bee
- Loginizer
- Google Analytics for WordPress by MonsterInsights
- Broken Link Checker
- ThirstyAffiliates Link Manager
- Sumo
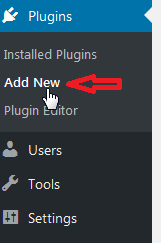

Once you have found your chosen plugin just hit the Install Now button for that plugin then hit the Activate button. Rinse and repeat for each plugin. Feel free to work with any wizards for the plugins as you are installing.
Select a WordPress Theme
Now there are two ways you can go with themes, you can go the free route, which is OK to do, or you can go the premium route.
Benefits of getting a premium WordPress Theme:
- Premium Themes have more features.
- More customization options.
- Regular updates to the theme
- Premium Themes come with suppport
- More unique look due to less people using premium themes and the customization options.
If you are looking for some beautiful WordPress themes, Bluchic has a gorgeous collection of premium WordPress themes available.
Themeisle is another highly rated WordPress theme developer that has premium themes.
If you go with a premium theme, just follow the instructions with the theme you purchase on how to install it and get it up and running.
If you would like to go the free route, one easy way to get them is to go in your WordPress admin menu and click on Appearance -> Themes and just browse until you find something you like, download and click install then Activate.
Remove any Sample Pages and Posts
Sometimes WordPress Themes come with sample pages and posts to help show off their features. We need to get rid of those.
In your WordPress admin go to Posts -> All Posts and remove any sample posts that are there, this might be titled “Hello World”. Then go to Pages -> All Pages and remove any sample pages there.
Set Up Your Privacy Policy
You need a privacy policy on your site to be approved for just about anything from AdSense to some affiliate programs.
It is highly recommended to get a legal pack from someone who knows what they are doing. There is a legal bundle that is made by a lawyer you can get that will give you everything you need, and that is the Website Legal Bundle from ASelfGuru.
If however you can’t afford that at this time, there is something that can get you a privacy policy until you can get the Website Bundle form ASelfGuru. And that’s the WP Auto Terms plugin.
Set Up Your Contact Page
By now you should have installed the plugin WP Forms. This plugin will allow you to set up a Contact Me page.
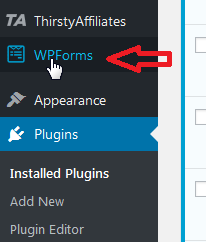
On the left hand side menu in your WordPress admin click on WPForms.
Then click on the Add New button at the top of the WPForms admin page.
Click on Simple Contact Form and once the form comes up just click on Save then click the x in the top right corner to close out the form editor.
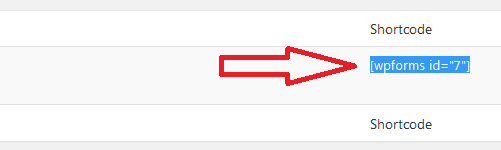
Now you will see on the right hand side next to the title of the form you just created a Shortcode. Highlight and copy that.
Now we need to create a Contact Page.
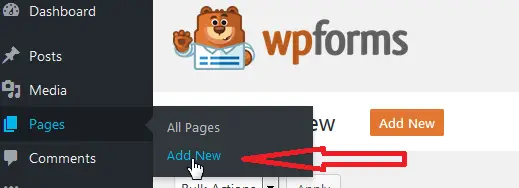
On you left hand menu go to Pages then click on Add New.
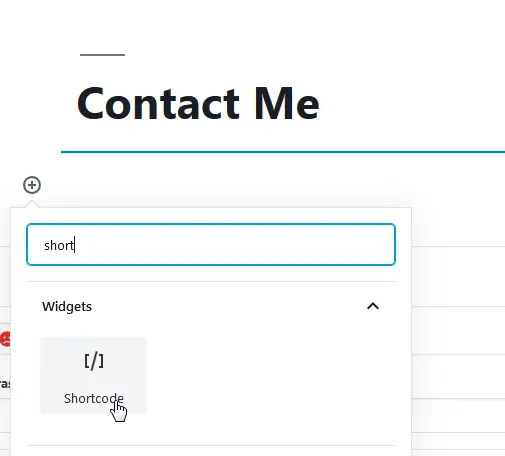
Put Contact Me in the Title box and in the next block click on the little plus sign and type short in the search box, then click on the Shortcode widget.
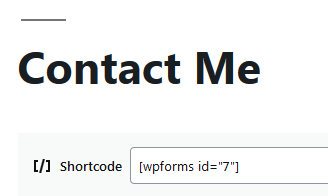
Now paste in the shortcode you had copied from WPForms into the shortcode box. Then click on Publish in the top right hand side of the screen.
Test Your Contact Form
Now you want to go and send a test from the contact form you just created. It should send the contact info to the admin email that is set in your admin profile.
This is an important step in the pre-launch blog checklist, as you don’t want to launch your blog only to find out no one can contact you.
Social Media
Don’t forget to grab your social media accounts.
It’s good to make sure you snag the name of your blog for the major social media networks even if you only intend on focusing on just one or two platforms at first. This way no one can grab the name down the road.
So at least set up Pinterest, Twitter, Facebook, and Instagram.
If you want to jump in on Pinterest check out our post How to Get Started With Pinterest for Blog Traffic.
Get a Free trial of Tailwind, this way you can automate Pinterest when you’re just starting out.
Look at Your Site on All Major Browsers and on a Portable Device
Use Internet Explorer, Chrome, Safari, and Firefox to see how your site is looking.
And check it out on mobile device like a phone or tablet, or both if you have access.
It’s important that your site is accessible from all devices, as not all of your readers are going to be using a computer.
Get an Email Service
You want to start building your email list right from the start. So you need to get an email service right away.
MailerLite is free for up to 1000 subscribers, so it’s perfect for new bloggers. They also have a great user interface that makes setting up your email automation a breeze.
AWeber is another email service that is good. Especially if you are going to be focused on Health and Fitness, Making Money Online, or general Affiliate Marketing as many email services will not approve these niches. AWeber does not have a free version though just a 30 day free trial.
Now we’re done with the nuts and bolts of the pre-launch blog checklist and you are ready to get to blogging.
From here you can get your About Me page drawn up and get some initial content written.
You May Also Enjoy:
My Must Have Blogging Tools and Services from 2019
Blog Post Checklist for SEO and More
Do You Have What It Takes to Run A Blogging Business?


This is a helpful post to aspiring and new bloggers, easy to follow guide on how to launch a blog. Thanks.
I’ve been considering started a second blog in Jan, so this is very helpful. Although I’ve managed to grow my current blog, I’m honestly at a loss as to how I managed to do it.